Terraform for Azure

Terraform is an infrastructure as code tool which can be used to manage the resources in both cloud and on-prem resources. You can then use a workflow to provision and manage all of your infrastructure throughout its lifecycle. Terraform creates and manages resources on cloud platforms and other services through their application programming interfaces (APIs)


Three stages in Terraform.

  • Write
    • Define the infrastructure as code.
  • Plan
    • Review the changes that is going to implement.
  • Apply
    • Apply the code to build/change the infrastructure.

Get your tool kit ready. What you need to run the Terraform code from your local machine.
  • Terraform
  • Git
  • Azure CLI
  • Visual Studio Code
Setting up your infrastructure-as-code workstation

Its important to have your infrastructure-as-code platform in a consistent environment Here we are using Chocoloately to automate the installation.
  1. Navigate to https://chocolatey.org/install
  2. Copy the installation script and run it on your local machine                                                                    Set-ExecutionPolicy Bypass -Scope Process -Force; [System.Net.ServicePointManager]::SecurityProtocol = [System.Net.ServicePointManager]::SecurityProtocol -bor 3072; iex ((New-Object System.Net.WebClient).DownloadString('https://community.chocolatey.org/install.ps1'))
  3. This will install the chocolatey package on your machine.
  4. Now lets create the required packages from chocolatey
  5. Navigate to https://community.chocolatey.org/packages
  6. Search for Terraform and click add button.
  7. Repeat the same for other tools
  8. Once all the tools are added click on generate script

  9. Follow the package creation page, Select Individual for the integration method.
  10. Copy the script.

  11. Run the script on your machine to install all the packages.
  12. It's done, now we have all the tools to run the Terraform codes form your local machine.

Monitor MARS Agent Backups.

Azure Backup uses the Microsoft Azure Recovery Services (MARS) agent to back up and recover files, folders, and the volume or system state from an on-premises computer to Azure.

The MARS agent supports the following backup scenarios:

  • Files and folders 
  • System State 
  • Volume Level 

When it comes to monitoring the MARS backup, the first preference will be monitoring alerts provided by Microsoft without any extra cost. However, this will not give an overview of the current recovery points available for each protected server. If you need a comprehensive report on the available recovery points, then you may need to enable Log Analytics in Azure, where you also need to pay for the storage account.

If you need a cost-free solution to get the backup summary from the protected servers, PowerShell can help you with that.

The below PowerShell script can be executed locally on one of the protected servers, which will retrieve the recovery point status from all the required servers and generate an HTML report. This report can then be emailed to the recipient.

Sample Output 


Secure Azure Network with Azure Firewall

This blog explains how to secure a Virtual network in Azure with Firewall Projection. 

Azure Firewall is a cloud-native and intelligent network firewall security service that provides the best of breed threat protection for your cloud workloads running in Azure. It's a fully stateful firewall as a service with built-in high availability and unrestricted cloud scalability. It provides both east-west and north-south traffic inspection. 

In this demonstration we will create a single Virtual network with two subnets

  • Virtual Network Name: Infrabeast_testvNet 
    • Network 10.0.0.0/16.
  • Subnet 1 AzureFirewallSubnet 
    • Subnet Range 10.0.0.128/26
  • Subnet 2 dataSubnet01
    • Subnet Range 10.0.0.0/25
We will cover the following configurations in this LAB setup 
  • Setup the network using Terraform. 
  • Deploy a virtual machine in the Data subnet. 
  • Deploy Azure Firewall and Policy
  • Create a default, Route. 
  • Configure an application rule to allow access to www.google.com.
  • Configure a network rule to allow access to external DNS servers.
  • Configure a NAT rule to allow a remote desktop to the test server.
  • Test the Firewall Policy 
Step 1: Setup the network Using Terraform  

We are using Terraform code to deploy the required Azurer resouces for this lab - The code can be found here - Code

The code will create the following resources in Azure . 
  • Resource Group
  • Virtual Network and subnets 
  • Public IP for Firewall 
  • IP Group for dataSubnet01
  • Firewall Policies (Application policy, Network Policy) 
  • Azure Firewall Instance 
Step 2: Create a Default route to forward all the traffic from Data subnet to Firewall local IP. 

  1. From Azure portal search for Route tables 
  2. Select Create, then enter or select the following values:
    1. Subscription Select your Azure subscription.
    2. Resource group Select Test-FW-RG.
    3. Region Select the same location that you used previously.
    4. Name DefaultRoute
  3. Select Review + create.
  4. Select Create.
  5. Wait for the deployment to complete 
    1. Go to resource.
    2. On the Firewall-route page, select Subnets and then select Associate.
    3. Select Virtual network > dataSubnet01
    4. Select OK.
    5. Select Routes and then select Add.
      1. For Route name, enter fw-dg.
      2. For Address prefix, enter 0.0.0.0/0.
      3. For Next hop type, select Virtual appliance.
      4. For Next hop address, enter the private IP address for the firewall.
      5. Select OK


Step 3: Deploy a virtual machine in the Data subnet

     Once the infrastructure has configured let's create a VM in the data subnet to test the firewall policies. A Windows server VM is created withe below configuration. 

Resource group       infra-test-rg01
Virtual machine name Data-SRV-01
Region       eastus
Username              *******
Password       *******
Network        Infrabeast-testv-Net
Subnet          subnet-server  
Public IP       NON

Step 4 Configure a NAT rule to allow a remote desktop to the test server.

This rule allows you to connect a remote desktop to the virtual machine through the firewall. 

  1. Select the DNAT rules.
  2. Select Add a rule collection.
  3. For Name, RDP Redirect.
  4. For Priority, enter 200.
  5. For Rule collection group, select DefaultDnatRuleCollectionGroup.
  6. Under Rules, for Name, enter DataVM
  7. For Source type, select IP address.
  8. For Source, enter *.
  9. For Protocol, select TCP.
  10. For Destination Ports, enter 3389.
  11. For Destination Type, select IP Address.
  12. For Destination, enter the firewall public IP address.
  13. For Translated address, enter the Srv-work private IP address.
  14. For Translated port, enter 3389.
  15. Select Add.


Step 4 Test the Firewall Policy 

Now we can test the firewall to confirm it works as expected 

  1. Connect a remote desktop to firewall public IP address and this should take you the Virtual machine in dataSubnet01
  2. Open Internet Explorer and browse to https://www.google.com, You should get the google page displayed. 
  3. Browse to https://www.youtube.com. this will be blocked by firewall. 


Azure AD Application Proxy

Welcome to this blog post on Azure Active Directory Application Proxy. Azure Active Directory (AAD) Application Proxy is a feature of Azure Active Directory which enable organizations to publish their internal application through Azure. 
Azure AD application proxy provides secure remote access to on-premises web applications such as:
  • Web applications that use Integrated Windows Authentication for authentication
  • Web applications that use form-based or header-based access
  • Web APIs that you want to expose to rich applications on different devices
  • Applications hosted behind a Remote Desktop Gateway
  • Rich client apps that are integrated with the Active Directory Authentication Library (ADAL)

How Application Proxy works

  1. After the user has accessed the application through an endpoint, the user is directed to the Azure AD sign-in page.
  2. After a successful sign-in, Azure AD sends a token to the user's client device.
  3. The client sends the token to the Application Proxy service, which retrieves the user principal name (UPN) and security principal name (SPN) from the token. Application Proxy then sends the request to the Application Proxy connector.
  4. If you have configured single sign-on, the connector performs any additional authentication required on behalf of the user.
  5. The connector sends the request to the on-premises application.
  6. The response is sent through the connector and Application Proxy service to the user.


RDS server with Azure Application Proxy 
Let’s configure our RDS server to use Azure AD proxy to enable the access from internet,First will look at the pre-requisites for Azure Application proxy. 
  1. Users require an AAD Premium Licence (P1 or P2)
  2. Application Proxy Connector machines must be enabled for TLS 1.2
  3. Connectors must be installed on Server 2012R2 or higher
  4. Connectors must be installed on a Domain Joined machine if you want single sign-on (SSO) to applications that use Integrated Windows Authentication (IWA) *

In our scenario we have a Remote service configured on a single server running on Windows server 2016, that means Both the RD Web and RD Gateway endpoints are be located on the same machine, and with a common root and it’s one of the requirement to configure RDS service with Azure application proxy.

Please refer this URL for installing and configuration your RDS service- https://docs.microsoft.com/en-us/windows-server/remote/remote-desktop-services/rds-deploy-infrastructure

Once you have the RDS server running, we can now configure the Azure Application Proxy .

Installing connector

You can install the connector in one of the member server 
  1. Sign in to the Azure portal 
  2. In left navigation panel, select Azure Active Directory.
  3. Under Manage, select Application proxy.
  4. Select Download connector service.
  5. Read the Terms of Service. When you're ready, select Accept terms & Download         
  6. At the bottom of the window, select Run to install the connector. An install wizard opens.
  7. Follow the instructions in the wizard to install the service
  8. Make sure you have port 443 ,80 enabled on the server you install the connector
  9. Once the installation is completed login back to Azure portal and make sure the connector service is reporting to the console. 

Publish the RD host endpoint
  1. Sign in as an administrator in the Azure portal.
  2. In the left navigation panel, select Azure Active Directory.
  3. Select Enterprise applications, and then select New application.
  4. In the On-premises applications section, select Add an on-premises application.
  5. In the Add your own on-premises application section, provide the required information about your application:


Internal URL  : This is the URL to access the application from inside your private network ,in our case its https://access.infrabeast.xy
External URL  : This is the URL to access the application from outside your private network ( This will be populated by Microsoft , but you can modify) 
Preauthentication method Azure Active Directory
Translate URL headers : No
  1. Assign users to the published RD application. Make sure they all have access to RDS, too
  2. Leave the single sign-on method for the application as Azure AD single sign-on disabled. Your users are asked to authenticate once to Azure AD and once to RD Web, but have single sign-on to RD Gateway.
  3. Select Azure Active Directory, and then App Registrations. Choose your app from the list
  4. Under Manage, select Branding
  5. Update the Home page URL field to point to your RD Web endpoint , In our case it is https://access.infrabeast.xyz/RDWeb .

Direct RDS traffic to Application Proxy

Connect to the RDS deployment as an administrator and change the RD Gateway server name for the deployment. This configuration ensures that connections go through the Azure AD Application Proxy service.
  1. Connect to the RDS server running the RD Connection Broker role.
  2. Launch Server Manager.
  3. Select Remote Desktop Services from the pane on the left.
  4. Select Overview.
  5. In the Deployment Overview section, select the drop-down menu and choose Edit deployment properties.
  6. In the RD Gateway tab, change the Server name field to the External URL that you set for the RD host endpoint in Application Proxy.
  7. Change the Logon method field to Password Authentication.
  8. Run this command for each collection. Replace <yourcollectionname> and <proxyfrontendurl> with your own information. This command enables single sign-on between RD Web and RD Gateway, and optimizes performance:
Set-RDSessionCollectionConfiguration -CollectionName "<yourcollectionname>" -CustomRdpProperty "pre-authentication server address:s:<proxyfrontendurl>`nrequire pre-authentication:i:1"

Final stage, testing your RDS application
  1. You could either access your application from assigned applications from Azure portal or you can use the external URL . 
  2. The external URL will take you to office 365 and once the user is successfully authenticated the user will be redirected to the internal application page. 

Future Enhancements
  1. Install additional connector on On-prem network for High availability 
  2. Enable SSO for RDS users 

Designing Azure Network


Creating a virtual network to experiment with is easy enough, but chances are, you will deploy multiple virtual networks over time to support the production needs of your organization. With some planning, you will be able to deploy virtual networks and connect the resources you need more effectively.

Your network design will have a significant impact on the Invoice , so it’s very important to choose the right model for your cloud infra.

Managing the network in Azure or any other cloud solutions are entirely different from your on prem network. If you look this from the OSI view the Physical layer and data link layer is managed by Azure , At layer 3 (network layer), we get the protocol IP. Protocols like TCP, UDP and ICMP are implemented on top of IP. When we create a network on Azure , it is created by Microsoft at layer 3 ;the network (IP) layer.

One question that may come into mind is, whether we can create VLANS on Azure or not? on Azure, we don’t have access to layer 2 so we cannot create VLANS. vNets are created using a technique called overlay network. Overlay Network is built on top of other networks and it allows creating multiple networks (with conflicting address space) on top of same underlying shared network. Its done using technology similar to hyper-v network Virtualization

Let’s see look at some basic considerations while planning the network on Azure .

Naming

All Azure resources have a name. The name must be unique within a scope, that may vary for each resource type.

Regions

All Azure resources are created in an Azure region and subscription. A resource can only be created in a virtual network that exists in the same region and subscription as the resource.

Network latency

When deciding which region(s) to deploy resources in, consider where consumers of the resources are physically located.
You can use https://www.azurespeed.com/ to identify the latency from your location but you also needs to consider the consumers location to choose the right region.


Data residency, sovereignty and compliance

If you have data residency, sovereignty, compliance, or resiliency requirements? If so, choosing the region that aligns to the requirements is also critical.
https://azure.microsoft.com/en-us/global-infrastructure/geographies/

Resiliency across Azure Availability Zones

Availability Zoness is a high-availability offering that protects your applications and data from datacenter failures. Availability Zones are unique physical locations within an Azure region.
You can deploy resources, such as virtual machines (VM) to different availability zones within the same virtual network. Not all Azure regions support availability zones however.

Subscriptions

You can deploy as many virtual networks as required within each subscription, up to the limit. Some organizations have different subscriptions for different departments, for example.

             We also needs to consider network Security and connectivity requirements wile deploying the network.

Designing our network. 

We need to Design the network for best performance and security, some of the organizations will give more importance for the security where others needs the best performance.
Here is the some consideration for planning your workloads in Azure, we are only looking at the network requirements.

1.Catalog your software and workloads to deployed in Azure
2.Plan the destination(s) for each of your workloads
3.Plan the security requirements for workloads

Network Topology 

Lets us look at some commonly used network typologies in Azure .

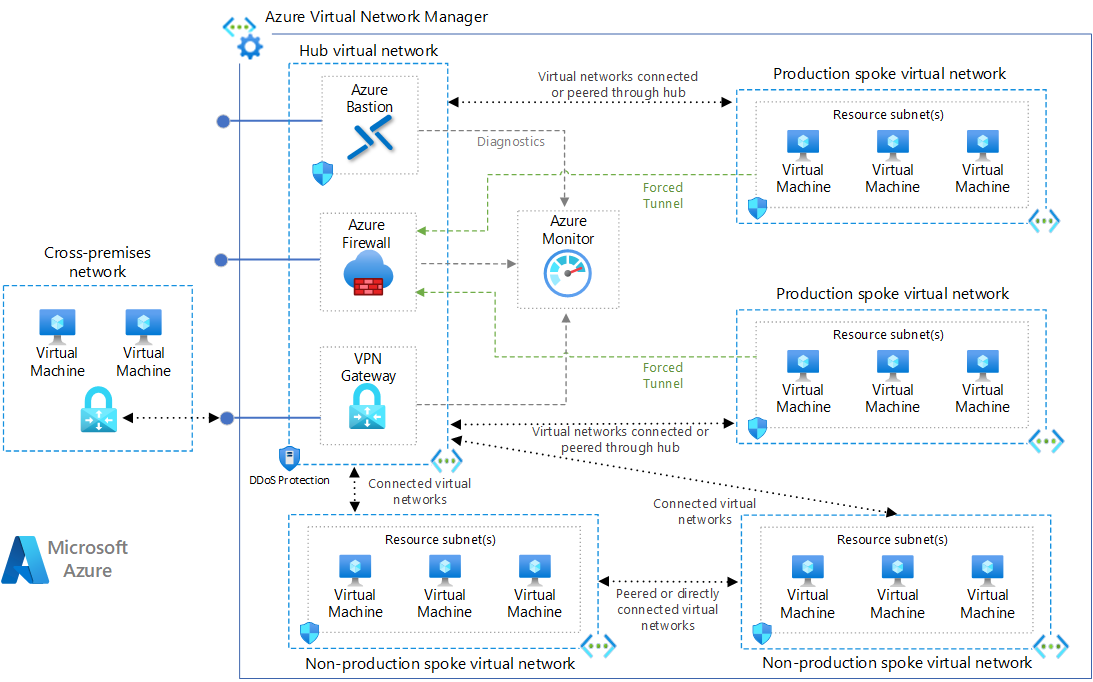
1.Hub-Spoke Network Topology


                                  The hub is a virtual network in Azure that acts as a central point of connectivity to your on-premises network. The spokes are virtual networks that peer with the hub, and can be used to isolate workloads. Traffic flows between the on-premises datacenter and the hub through an ExpressRoute or VPN gateway connection.

Typical uses for this architecture include:

  • Workloads deployed in different environments, such as development, testing, and production, that require shared services such as DNS, IDS, NTP, or AD DS. Shared services are placed in the hub virtual network, while each environment is deployed to a spoke to maintain isolation.
  • Workloads that do not require connectivity to each other, but require access to shared services.
  • Enterprises that require central control over security aspects, such as a firewall in the hub as a DMZ, and segregated management for the workloads in each spoke.


2.Hybrid Network

The architecture implements a DMZ, also called a perimeter network, between the on-premises network and an Azure virtual network. All inbound and outbound traffic passes through Azure Firewall.


This architecture requires a connection to your on-premises datacenter, using either a VPN gateway or an ExpressRoute connection. Typical uses for this architecture include:


  • Hybrid applications where workloads run partly on-premises and partly in Azure.
  • Infrastructure that requires granular control over traffic entering an Azure virtual network from an on-premises datacenter.
  • Applications that must audit outgoing traffic. This is often a regulatory requirement of many commercial systems and can help to prevent public disclosure of private information.

Automate Cisco Switch Configuration Backups

This Script can be used to automate the configuration backup of network devices using SSH and TFTP Server.
It’s a common issue to backup cisco switch configuration through PowerShell as the default login will not have the privilege to run the switch backups but this is not affected in HP switches.
This script will help you to pass the enable mode password as a stream for Cisco switches.

Prerequisites 

  1. Window’s PowerShell version 5 and above  
  2. A TFTP server 
  3. SSH should be enabled on all the switches 
  4. Posh-SSH module should be installed on Windows PowerShell
  5. Configure the root folder for TFTP service, for me its “C:\Users\Test\Desktop\RK\”
  6. Create a notepad file in the root location and rename to switches, Input the management IP of all the required switches into this notepad file.
  7. Open an administrative PowerShell and execute the below command to encrypt the switch password.                                                                                                                   Read-Host ‘Enter Password:’ | ConvertTo-SecureString -AsPlainText -Force | ConvertFrom- SecureString | Out-File "C:\temp\password.txt
  8. Copy the password.txt file to “C:\Users\Test\Desktop\RK\ " 

References Links

Please follow the below steps for configuring the backup script. 

  1. Download the PowerShell script from below Github repository.   https://github.com/Renjeeshrk/Powershell-Scripts
  2. Update the below values in Script
  3. $tftp_server = <TFTP server IP>
  4. $username = < Switch User name >
  5. $pwfile =<path to encrypted password file>
  6. $switches_array = <Change the path to input file>
  7. $stream.Write("%password%`n") ( Replace the %password% with enable mode password)

  8. Note: Replace the folder path of TFTP root for all the required areas
  9. Run the script from PowerShell.                                 PS>.\Network_switch_auto_backup.ps1
  10. Output will be saved in the root folder.                        \2019\June\07122018\xx.xx.xx.xx\running-config.cfg                            \2019\June\07122018\ xx.xx.xx.xx\\startup-config.cfg

Reinstall Standalone Hyper V Server

One of my standalone Hyper-V host machines had a disk crash, and unfortunately, there was no RAID configured for the system drive. A failed OS disk was not a big deal when I had all my VMs on a different drive. I got the failed disk replaced and loaded it with a new OS; everything looked good. However, it was not so easy to import the VMs. Let's see what made it difficult.

The first task was to find out the virtual machine configuration files from the data drive, and PowerShell made that very easy for me. When I tried to import the VM’s using PowerShell the below error was given. 


As per the Powershell, output suggested I tried using Compare-VM to figure out the issue and the result was pointing to missing Virtual Hard disk file , please see the below screenshot.


So the problem is the Virtual Disk files are in different locations and our new Host server is unable to locate them to import the VM and here is the solution. (https://blogs.msdn.microsoft.com/virtual_pc_guy/2014/04/14/importing-a-vm-with-vhds-in-different-paths/)
So I've performed the below steps to correct this issue and then import the VM's using Import command. 
1. Look at .Source.Path on each incompatibility to determine which virtual hard disk is missing


2. Use Set-VMHardDiskDrive to correct the location for the first virtual hard disk:


3. Finally, we need to import the VM with the corrected virtual machine compatibility report.


x